Unveil the secret to flawless makeup with the art of contouring and highlighting. Whether you’re a novice or a beauty guru, mastering these techniques can elevate your look to stunning new heights. In this guide, we’ll break down the basics of contouring and highlighting for beginners, giving you the tools you need to sculpt and illuminate your features like a pro. So grab your brushes and get ready to enhance your beauty game with ease.
Understanding the Basics of Contouring and Highlighting
Contouring and highlighting are essential techniques in makeup application that can enhance facial features and create a more sculpted look. By using darker shades to contour and lighter shades to highlight, you can create the illusion of more defined cheekbones, a slimmer nose, and a brighter complexion.
When contouring, it’s important to apply the darker shade in the areas where shadows naturally fall on your face, such as the hollows of your cheeks, along your jawline, and on the sides of your nose. Blend the product well to ensure a seamless transition between the contour and your natural skin tone.
On the other hand, highlighting is all about bringing light to the high points of your face, such as the tops of your cheekbones, the bridge of your nose, and your brow bone. This helps to create a more dimensional look and gives your skin a radiant glow.
Remember, practice makes perfect when it comes to contouring and highlighting. Take your time to experiment with different techniques and products to find what works best for your unique face shape and skin tone. And most importantly, have fun with it!
Choosing the Right Products for Your Skin Type
When it comes to contouring and highlighting for beginners, it’s important to choose the right products for your skin type. The key is to enhance your natural features without overpowering your overall look. To achieve a flawless contour and highlight, consider the following tips:
- Identify Your Skin Type: Determine whether you have oily, dry, combination, or sensitive skin before selecting products. Choose oil-free formulas for oily skin and hydrating products for dry skin.
- Use Cream or Powder Based Products: Cream products are great for adding dimension to the face, while powder formulas are ideal for setting and blending. Experiment with both to see which works best for you.
- Invest in Quality Brushes: A good set of brushes can make all the difference when it comes to achieving a seamless contour and highlight. Look for brushes specifically designed for contouring and highlighting.
Remember, practice makes perfect when it comes to contouring and highlighting. Take your time experimenting with different products and techniques to find what works best for your skin type. With a little patience and the right products, you’ll be able to master the art of contouring and highlighting in no time!
Step-by-Step Guide to Achieving a Flawless Contour and Highlight
Ready to master the art of contouring and highlighting? Follow this step-by-step guide to achieve a flawless look that will enhance your features and give you that perfect glow.
Prep Your Skin
Before you start contouring and highlighting, make sure your skin is clean and moisturized. Apply a primer to create a smooth base for your makeup.
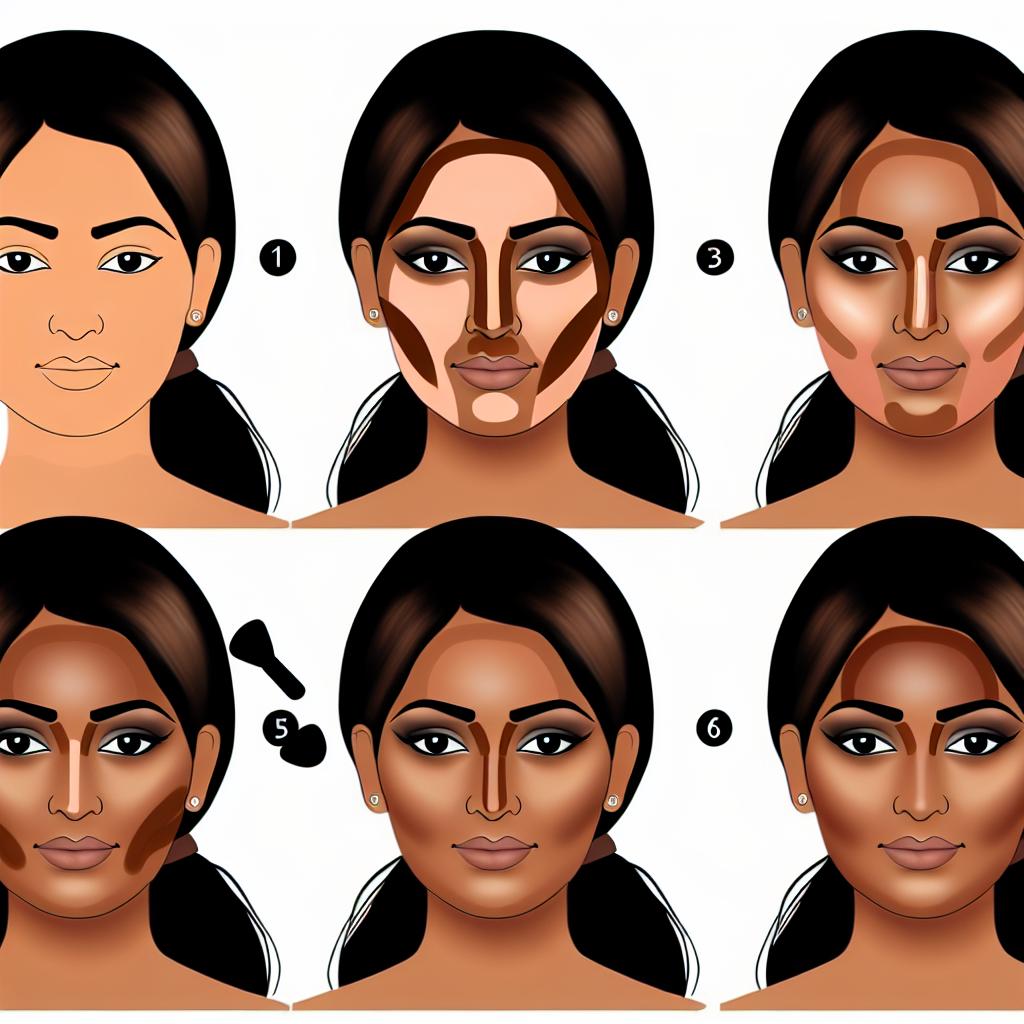
Contouring
- Choose a contour shade that is 1-2 shades darker than your skin tone.
- Using a contour brush, apply the contour shade along the hollows of your cheeks, the sides of your nose, and along your jawline.
- Blend the contour color well to avoid any harsh lines.
Highlighting
- Choose a highlighter that is 1-2 shades lighter than your skin tone.
- Apply the highlighter to the high points of your face, such as the tops of your cheekbones, the bridge of your nose, and your brow bone.
- Blend the highlighter for a seamless finish.
Common Mistakes to Avoid When Contouring and Highlighting
One of the most common mistakes that beginners make when it comes to contouring and highlighting is using the wrong shades. It is crucial to choose a contour color that is only two shades darker than your natural skin tone. Using a contour shade that is too dark can make your face look muddy and unnatural. Similarly, using a highlighter that is too light can create a harsh contrast and make your makeup look unblended.
- Avoid using shimmery highlighters on areas that you want to contour, as this can make your face look overly glittery.
- Blend, blend, blend! Blending is key when it comes to contouring and highlighting. Make sure to blend out harsh lines and edges to create a seamless and natural look.
- Don’t forget to set your makeup with a translucent powder to ensure that it lasts all day and stays in place.
| Common Mistakes | How to Avoid Them |
|---|---|
| Using the wrong shades | Choose a contour color that is only two shades darker than your natural skin tone. |
| Not blending properly | Make sure to blend out harsh lines and edges to create a seamless and natural look. |
| Forgetting to set makeup | Set your makeup with a translucent powder to ensure that it lasts all day. |
By avoiding these common mistakes and following the tips above, you can achieve a flawless and natural-looking contour and highlight that enhances your features and adds dimension to your face.
As you embark on your journey to master the art of contouring and highlighting, remember that practice makes perfect. Be patient with yourself and don’t be afraid to experiment with different techniques and products. With time and dedication, you’ll soon be a pro at sculpting and enhancing your natural features. So go forth and conquer those cheekbones, jawlines, and brow bones with confidence!